Showing posts with label peak performance. Show all posts

Sunday, July 18, 2010

Exercise of the Week: Happy, Healthy Knees Part III

Level: Beginner to Advanced

Specificity: Quadriceps and Hip Flexor flexibility

Goal: Injury prevention/rehabilitation

Equipment: Strap or towel


This week we'll continue our series on patellar tendinitis or "jumper's knee", the most common overuse injury for volleyball players. The anatomy of the knee can be seen here, and an excellent overview of common knee injuries and rehab exercises to consider here.

The lying quadriceps stretch, an excellent exercise for prevention and rehabilitation of patellar tendinitis, is our exercise this week. Remember static stretching exercises, like the lying quadriceps stretch, should be performed after a thorough warm-up. An example of a volleyball specific warm-up can be seen here.


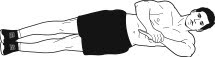
Start position: Lie facedown on the floor with the legs extended. Bend your left knee and grasp the top of your foot or ankle with your left hand. You can use a strap or towel if you cannot grasp your foot. Gradually pull your foot toward your glutes until you feel a stretch along the front of your left thigh. Be careful not to twist your knee.

Hold the stretch for 15 to 30 seconds or 3 to 5 deep breaths. Switch legs and repeat 3 times for each side. It is important to stretch to the point of mild tension and not to over stretch during this movement.

Incorporate the lying quadriceps stretch into your routine 3-7 times per week.

Remember, this information should be used in conjunction with the advice of your health care provider. Thanks for reading and be sure to check back for the next exercise in our series on Healthy, Happy Knees.

See you on the beach!

Eric Hand, MA, CSCS
Exercise Physiologist and Strength and Conditioning Specialist
Fast Twitch Fitness

"We're all athletes. Some of us are just farther along in our training."

Pictures from kinesiology.wikispaces.com

Friday, July 9, 2010

Exercise of the Week: Happy, Healthy Knees Part II

Level: Beginner to Advanced

Specificity: Hamstring flexibility

Goal: Injury prevention/rehabilitation

Equipment: Stool


Last week we discussed patellar tendinitis or "jumper's knee", the most common overuse injury for volleyball players. The anatomy of the knee can be seen here.

This week we'll introduce the standing hamstring stretch, an excellent exercise for prevention and rehabilitation of patellar tendinitis. Static stretching exercises should be performed after a thorough warm-up, demonstrated here.


Start position: Stand in front of a stool, about 15 inches high, with pelvis and shoulders square to the stool. Place the heel of your right leg on a stool with toes pointed up to the ceiling. Keep your right leg straight, or place a micro-bend in the knee if you are prone to hyper-extension of the knee.

Ensure that the left foot is pointed straight ahead.

Reach the crown of your head to the ceiling, creating length in your spine as you slowly hinge at the hips, leaning forward until you feel a mild stretch in the back of your right thigh.

As you lean forward, lead with your chest and look straight ahead, ensuring that you keep your spine long and back flat.

Hold the stretch for 15 to 30 seconds or 3 to 5 deep breaths. Switch legs and repeat 3 times for each side. It is important to just stretch to the point of mild tension and not to over stretch, or hyperextend the knee during this movement. The goal is not touch your toes, but to feel a mild stretch in the hamstrings.

Incorporate the standing hamstring stretch into your routine 3-7 times per week.

Thanks for reading and be sure to check back for the next exercise in our series on Healthy, Happy Knees.


See you on the beach!

Eric Hand, MA, CSCS
Exercise Physiologist and Strength and Conditioning Specialist
Fast Twitch Fitness

"We're all athletes. Some of us are just farther along in our training."

Pictures from floota.com

Sunday, June 20, 2010

Exercise of the Week: Scapular Protraction-Retraction

Level: Beginner to Advanced

Specificity: Shoulder stability and strength

Goal: Injury prevention

Equipment: None

This week we'll continue our series on shoulder stability with Scapular Protraction-Retraction. I apologize if the name of this movement brings back haunting memories of high school geometry. The Scapular protraction-retraction movement is designed to promote stability and strength in the shoulder joint. The shoulder joint
provides the greatest range of motion of any joint in the human body, but you already knew that from my last few posts. Right?

Anatomy of the shoulder and rotator cuff can be seen here:


Maintaining a healthy shoulder is crucial to success and longevity in volleyball as the shoulder is involved in all the major skills - serving, setting, digging, blocking and hitting. Research shows that weakness and fatigue of scapular-stabilizing muscles (trapezius, rhomboids, serratus anterior) can lead to pain and a decrease in rotator cuff strength. Our exercise this week will promote proper functioning of the scapula.


Start position: Assume a push-up position with hands directly under shoulders and back flat.

Keeping arms straight, retract shoulder blades by squeezing them together as if you were squeezing a tennis ball between them.

Do not go all the way down as you would with a regular push up. This is a rather subtle movement, designed to isolate and strengthen the scapula stabilizers. You will only move a matter of 1-3 inches for this exercise.

Complete the movement by protracting shoulder blades (spread them apart). Now that was easy wasn't it?

Begin with 10-20 repetitions and work up to 50.

To stabilize your scapula and reduce the strain in your neck and upper shoulders incorporate this movement into your routine 1-2 times per week.

Thanks for reading and be sure to check back next week for more beach volleyball conditioning exercises.


See you on the beach!

Eric Hand, MA, CSCS
Exercise Physiologist and Strength and Conditioning Specialist
Fast Twitch Fitness

"We're all athletes. Some of us are just farther along in our training."

Pictures from crossfitinvictus.com fitnessspotlight.com

Sunday, June 13, 2010

Exercise of the Week: The Sleeper Stretch

Level: Beginner to Advanced

Specificity: Shoulder stability and mobility

Goal: Injury prevention

Equipment: None

This week we'll continue our series on shoulder stability with the Sleeper stretch. No, this does not mean lying down on the couch and dozing off after a long day of volleyball. The Sleeper stretch is a static stretch designed to promote mobility in the shoulder joint.


The shoulder joint provides the greatest range of motion of any joint in the human body.
Maintaining a healthy shoulder is crucial to success and longevity in volleyball as the shoulder is involved in all the major skills - serving, setting, digging, blocking and hitting.

The repetitive actions of serving and hitting in beach volleyball can cause the posterior capsule of the shoulder to tighten over time causing a loss of internal rotation. This loss in mobility can add stress to the musculature of the shoulder joint, increasing our risk of injury.

Any program designed to promote the health and longevity of the shoulder should include a balance of strengthening and stretching exercises. For many of my clients the value of stretching is often overlooked. I don't call stretching the flossing of the exercise world for nothing. It might not always be fun but it's imperative to keeping yourself injury free. Chronically shortened muscles lead to stress, decreased performance, pain and injury. So, if it's been a while since you've "flossed" your shoulders, try this weeks exercise.

The anatomy of the shoulder and rotator cuff can be seen here:


Start position: Lie on your left side forming a straight line with your body. Your shoulders should be stacked directly on top of one another. You may want to use a foam roller or pillow to support your head. Use your left arm as a kickstand by placing your upper left arm on the floor with your fingers pointing to the ceiling. You should have a 90-degree angle with your left arm.


Use your right hand to apply gentle pressure on your left forearm, pushing it towards the floor, without allowing your upper arm to rise.

This is a relatively subtle stretch. Don't expect to be able to place your hand on the floor. Getting to 45-degrees would be...a stretch (ha, ha!) for most athletes.

Hold the stretch for 15-30 seconds. Repeat 3-5 times and switch sides.

Stretching is best performed at the end of a workout after you are thoroughly warmed-up. Include the Sleeper stretch 2-3 times per week as part of your post play routine and before that well deserved nap. Zzzzzzz...........

Thanks for reading and be sure to check back next week for more beach volleyball conditioning exercises.

See you on the beach!

Eric Hand, MA, CSCS
Exercise Physiologist and Strength and Conditioning Specialist
Fast Twitch Fitness

"We're all athletes. Some of us are just farther along in our training."

Exercise picture from www.menshealth.com

Exercise of the Week: Lat Stretch

Level: Beginner to Advanced

Goal: Improved performance and injury prevention

Muscles used: Latissimus Dorsi, Teres Major

Equipment: Physioball, chair or post

Our focus this week is enhancing the effectiveness of our spike by increasing the range of motion in our latissimus dorsi (lats).
The lats are the widest and most powerful muscle of the back. The anatomy of the lats can be seen here:


One of the keys to an effective spike is reaching full extension of the hitting arm to achieve a high point of contact.


Who better to demonstrate perfect hitting technique than Misty May-Treanor?

Due to it's insertion on the humerus (upper arm bone) if the lattisimus dorsi muscle is tight or shortened this will impede our ability to reach up for that buttery set. Umm...buttery sets.


So to ensure that you can reach up and get yours try out this stretch:


Start position - begin by kneeling on the floor, with the physio-ball directly in front of you and hands on top of the ball.

Roll the ball forward by extending the arms and allowing your hips to shift backwards.

Continue to extend the arms forward and your hips backwards until a stretch is felt in the upper back, lats, or shoulders.

Gaze down toward the floor to keep your cervical spine neutral.

Hold this position for 15- 30 seconds. Repeat 1-2 times.

You can also perform this stretch with a partner by holding onto their forearms, slowly bending your knees and leaning back.

Thanks for reading and be sure to check back next week for more beach volleyball conditioning exercises.

See you on the beach!

Eric Hand, MA, CSCS

Exercise Physiologist and Strength and Conditioning Specialist

Fast Twitch Fitness


"We're all athletes. Some of us are just farther along in our training."

Pictures from stacktv.com, pgatour.com, uoregon.edu

Sunday, May 30, 2010

Exercise of the Week: Subscapularis Stretch

Level: Intermediate to Advanced

Specificity: Shoulder stability

Goal: Injury prevention

Muscles Used: Subscapularis, Pectoralis Major, Deltoids


Equipment: Broomstick

This week we'll continue our series on shoulder stability.
The shoulder joint provides the greatest range of motion of any joint in the human body. Maintaining a healthy shoulder is crucial to success and longevity in volleyball as the shoulder is involved in all the major skills - serving, setting, digging, blocking and hitting. However, frequent use of a joint that provides such a wide range of motion can increase our risk for injury.

Any program designed to promote the health and longevity of the shoulder should include a balance of strengthening and stretching exercises.
For many of us the value of stretching is often overlooked. One of my clients put it best - "stretching is like the flossing of the exercise world, it's something that we know we should do but don't do enough." If it's been a while since you've "flossed" your shoulders, I encourage you to try this weeks exercise.

The anatomy of the shoulder and rotator cuff can be seen here:


Our focus this week will be on maintaining/increasing the range of motion of the internal rotators of the shoulder, including the subscapularis, pectoralis major, and deltoid muscles.


Start position: Stand and hold a broomstick or pole in your left arm.


Place your left arm against your abdomen with your left thumb up, pinky down.

Raise your right arm and reach back to grab the broomstick with your right pinky up, thumb down. The broomstick should rest against the back of your right arm.

Position your right arm so that your upper arm (humerus) is parallel to the ground and your forearm is perpendicular to the ground. You should have a 90 degree angle at the elbow.


With your left hand slowly pull the bottom of the broomstick forward until you feel a gentle stretch along the front of the shoulder and underneath your right shoulder blade (scapula).

Hold the stretch for 15-30 seconds and repeat 3-5 times.

Stretching is best performed at the end of a workout after you are thoroughly warmed-up. Include the Subscapularis stretch 2-3 times per week when you get back from the beach and while you're at it, sweep up all that sand you just dragged in!

Thanks for reading and be sure to check back next week for part III of our series on shoulder stabilization for injury prevention.

See you on the beach!

Eric Hand, MA, CSCS
Exercise Physiologist and Strength and Conditioning Specialist
Fast Twitch Fitness

"We're all athletes. Some of us are just farther along in our training."

Exercise pictures from www.floota.com


Monday, May 24, 2010

Exercise of the Week: Side Lying External Rotation

Level: Beginner to Advanced

Specificity: Shoulder stability

Goal: Injury prevention

Muscles Used: Infraspinatus and Teres Minor

This week we'll begin our series on Shoulder Stability. Maintaining a healthy shoulder is crucial to success in volleyball as the shoulder is involved in all of the major skills - serving, setting, digging and hitting. The shoulder joint provides the greatest range of motion of any joint in the body which allows us to perform the skills listed above. However, frequent use of a joint that provides such a wide range of motion can increase our risk of injury.


Our exercise this week is designed to increase the strength of the external rotators of the rotator cuff. The anatomy of the shoulder and rotator cuff can be seen here:


Why spend time to strengthen the small muscles of the rotator cuff? To put it simply, a chain is only as strong as its weakest link. When the rotator cuff muscles are weak, the rest of the shoulder complex is put at risk because it now has to take on an unnatural portion of the work.

The good news is a few simple exercises is all it takes to strengthen the rotator cuff muscles. Our first exercise, and one of the most effective strengthening exercises for the rotator cuff, is the Side Lying External Rotation.

Start position: Lie on your right side with a light dumbbell in your left hand.


Begin with your left arm bent 90°, your upper arm held tight against your ribcage and your forearm angled toward the floor.

Gradually rotate your left shoulder so that the forearm travels upwards, away from the floor. Raise the dumbbell as high as you can, without letting your upper arm lose contact with your ribcage.

Slowly return to the starting position. Complete 10 to 12 repetitions. Repeat on the opposite side.

Incorporate strengthening exercises like the Side Lying External Rotation into your conditioning routine once or twice per week for best results.

Thanks for reading and be sure to check back next week for part II of our series on shoulder stabilization for injury prevention.


See you on the beach!

Eric Hand, MA, CSCS
Exercise Physiologist and Strength and Conditioning Specialist
Fast Twitch Fitness

"We're all athletes. Some of us are just farther along in our training."

Exercise pictures from http://stacktv.stack.com/

Saturday, May 15, 2010

Exercise of the Week: The Box

Level: Beginner to Advanced

Goal: Improve footwork and ability to change direction quickly

Equipment: None

This week concludes our series on agility training. Remember, agility is the ability to move quickly and change directions while maintaining control of the body. To be effective on the beach an athlete will need speed, balance, power and co-ordination. Agility training plays an integral role in developing these attributes.

Our drill this week is the Box. This is an excellent drill to warm-up the lower body, improve our footwork and enhance our ability to change directions quickly.

Be sure to perform a thorough warm up (click here) before performing the Box drill.


Start in the back left corner, facing the net, and sprint straight ahead to the net.
Immediately transition to a shuffle across the court to the front right corner.
Transition quickly to a back pedal all the way to the back right corner of the court.
Finish the drill by shuffling across to the back left corner of the court where you started.

Repeat 3-5 times with 45-60 seconds of rest in between repetitions.

Key points - When you shuffle stay low in a defensive position and avoid clicking your heels or crossing your feet. Keep the weight on the balls of your feet and not your heels.

Intermediate and advanced players can increase the intensity of the drill by adding an approach jump after the sprint to the net and a block jump after the first shuffle.

For variety you may also want to try the following pattern.


Incorporate agility drills like the Box into your conditioning routine once or twice per week for best results.

Thanks for reading and be sure to check back next week when we'll start our series on shoulder stabilization for injury prevention.

See you on the beach!

Eric Hand, MA, CSCS
Exercise Physiologist and Strength and Conditioning Specialist
Fast Twitch Fitness

"We're all athletes. Some of us are just farther along in our training."

Pictures from http://stacktv.stack.com/

Monday, May 10, 2010

Exercise of the Week: Line Hops

Level: Beginner to Advanced

Goal: Increase ability to change direction quickly, injury prevention

Equipment: None

This week we'll continue our series on agility training. Agility is the ability to move quickly and change directions while maintaining control of the body. To be effective on the beach an athlete will need speed, balance, power and co-ordination. Agility training plays an integral role in developing these attributes.

Our drill this week is the Line Hop. This is an excellent exercise to warm-up the lower body and increase our ability to change directions quickly.

Draw lines, two to three feet long, in the sand to form a + shape.


Facing the net, stand in the lower right corner of the box. It may help to think of this spot as box 1. The box immediately to your left would represent box 2. The box immediately in front of box 2 would represent box 3. The box immediately to the right of box 3 would represent box 4.


Starting in box one perform small, quick hops in a 1-2-3-4 pattern (left, forward, right, back). Repeat this pattern as many times as you can for 15 seconds. Rest for one minute and repeat.

For variety try hopping in different patterns. Some examples would be 1-3-2-4 (diagonal, back, diagonal, back), 1-4-2-3 (forward, diagonal, forward, diagonal), 1-2-4-3 (left, diagonal, right, diagonal).

Perform 2 sets of 2 different patterns.

Advanced athletes can work up to single-leg hops, repeating the pattern for 10 seconds with 30 seconds rest in between sets. Remember to work both legs!

Key points: Think of moving you feet as quickly as possible while staying in control, imagine hot coals underneath your feet! Keep your hips square and land as softly as possible.

Incorporate agility drills like the Line Hop into your conditioning routine once or twice per week for best results.

See you on the beach!

Eric Hand, MA CSCS
Exercise Physiologist and Strength and Conditioning Specialist
Fast Twitch Fitness

"We're all athletes. Some of us are just farther along in our training."

Picture from http://stacktv.stack.com/

Sunday, May 2, 2010

Exercise of the Week: The Lateral Hop and Hold

Level: Intermediate and Advanced

Goal: Increase ability to change direction quickly, injury prevention

Equipment: None

This week we'll continue our series on agility training. Agility is the ability to move quickly and change directions while maintaining control of the body. To be effective on the beach an athlete will need speed, balance, power and co-ordination. Agility training plays an integral role in developing these attributes.

Our drill this week is the Lateral Hop and Hold. This is an excellent exercise for increasing our agility and reducing muscle soreness and risk of injury in the hips and knees.

Be sure to perform a thorough warm up before performing the Lateral Hop and Hold.

Stand on right leg with right knee slightly bent.


Hop two to three feet laterally toward the left.


Land softly on the left leg and hold position for two seconds.


Push off left leg to hop laterally to the right.

Land softly on the right leg and hold position for two seconds.

Repeat for a total of 10 repetitions.

Intermediate players should perform 2 sets with 30 seconds of rest between sets.
Advanced players should perform 3-4 sets with 30 second rest periods between sets.

Key points: Keep your hips square and land as softly as possible. Gradually increase the intensity of the exercise by bounding higher and farther from side to side.

Incorporate agility drills like the Lateral Hop and Hold into your conditioning routine once or twice per week for best results.

See you on the beach!
Eric Hand, MA CSCS
Exercise Physiologist and Strength and Conditioning Specialist
Fast Twitch Fitness

"We're all athletes. Some of us are just farther along in our training."

Picture from http://stacktv.stack.com/

Sunday, April 25, 2010

Exercise of the Week: The T Drill

Level: Beginner to advanced

Specificity: Acceleration, Deceleration, Lateral Movement

Goal: Improve Agility

Equipment: 4 cones

This week we'll begin our series on agility training. Agility is the ability to move quickly and change directions while maintaining control and balance of the body. The beach game requires players to move in various movement patterns (forward, backward, lateral, at 45 degree angles) within a single rally. To be effective on the beach an athlete will need speed, balance, power and co-ordination. Agility training plays an integral role in developing these attributes.

The first agility drill we'll review is the T drill. The T drill is an effective way to improve agility as it involves acceleration/deceleration, movement forward/backward/lateral as well as quick changes in direction.

Be sure to perform a thorough warm up (click here) before performing the T drill.

To set up the T drill, place two cones 10 yards apart from one another. Place a third cone in the middle of these two cones and a fourth cone ten yards from the third cone to form a T.


Start at the bottom (cone A) of the T and sprint to the middle cone (cone B).
Upon reaching the middle cone, side shuffle to the left cone (cone C).
Upon reaching the left most cone, immediately change directions and shuffle to the right most cone (cone D).
Upon reaching the right cone, change directions and shuffle back to the middle cone (cone B).
Finish the T by backpedaling to the start cone (cone A).

Repeat 2-5 times.

Key points: Keep your hips square, stay low in a defensive position and do not cross your feet as you shuffle.

Incorporate agility drills like this into your conditioning routine once or twice per week for best results.

See you on the beach!

Eric Hand, MA , CSCS
Exercise Physiologist and Strength & Conditioning Specialist
Fast Twitch Fitness

“We’re all athletes. Some of us are just farther along in our training.”

Picture from topendsports.com

Sunday, April 18, 2010

Exercise of the Week: The Superman

Level: Beginner/Intermediate

Specificity: Core strength and stability

Goal: Injury prevention, power

Muscles used: Erector Spinae, Trapezius, Anterior and Medial Deltoids, Gluteus Maximus

Equipment: none

This week we'll continue our series on torso/core conditioning exercises with the Superman. This is a great movement to develop muscle balance for the often neglected spinal erectors and trapezius muscles. Remember, the torso or core provides the link between upper and lower body strength and power. Including core conditioning in your training will provide you with a more stable platform for that perfect pass and develop the power necessary for the third hit.

Click here for muscles of the core

Start position: Lie on your stomach with your legs and arms fully extended, palms facing one another. Point your toes (plantar flex) toward the wall behind you. Maintain a neutral cervical spine by looking down toward the floor.


On an exhalation slowly raise both legs 3-6 inches off the ground while simultaneously raising your hands and arms 2-3 inches off the floor. Reach through your fingertips and toes to make your body as long as possible. Maintain a neutral cervical spine by continuing to look down at the floor. Hold for a count of 5. To increase the intensity of the exercise gradually increase the time you hold the up position.

Slowly release your legs and arms to the floor as you inhale.

Beginners should perform 1-2 sets of 10 repetitions. Intermediate/Advanced athletes should perform 2-3 sets of 20 repetitions.

Incorporate the Superman into your conditioning routine twice per week for best results. Be sure to check back next week as we start our series on agility training for the beach game.

See you on the beach!

Eric Hand, MA , CSCS
Exercise Physiologist and Strength & Conditioning Specialist
Fast Twitch Fitness

“We’re all athletes. Some of us are just farther along in our training.”

Picture from the American Council on Exercise