Showing posts with label volleyball. Show all posts

Sunday, July 25, 2010

Exercise of the Week: Happy, Healthy Knees Part IV

Level: Beginner to Advanced

Specificity: Quadriceps strengthening

Goal: Injury prevention/rehabilitation

Equipment: none


This week we'll continue our series on patellar tendinitis or "jumper's knee", the most common overuse injury for volleyball players. The anatomy of the knee can be seen here, and an excellent overview of common knee injuries and rehab exercises to consider here.

The past few weeks we have focused on increasing range of motion in the surrounding musculature of the knee, primarily the quadriceps and hamstrings. This week we'll discuss how to begin strengthening these muscles.

We'll begin our strengthening exercises with the lying straight leg raise. This exercise can be added to your rehab program when the knee pain has started to decrease.


Start position - Lie on your back with your good knee bent so that your foot rests flat on the floor. Straighten your injured leg.

Tighten the top of the thigh muscle of your injured leg. Slowly, raise your leg about 8-12 inches off the floor, hold for a 5 count at the top , and then lower the leg in a controlled manner. Completely relax your thigh muscles and then repeat for a total of 10 repetitions.

Perform up to 3 sets of 10 repetitions every other day, as tolerated.

Remember, this information should be used in conjunction with the advice of your health care provider. Thanks for reading and be sure to check back for the next exercise in our series on Healthy, Happy Knees.

See you on the beach!

Eric Hand, MA, CSCS
Exercise Physiologist and Strength and Conditioning Specialist
Fast Twitch Fitness

"We're all athletes. Some of us are just farther along in our training."

Pictures from health.com

Sunday, July 18, 2010

Exercise of the Week: Happy, Healthy Knees Part III

Level: Beginner to Advanced

Specificity: Quadriceps and Hip Flexor flexibility

Goal: Injury prevention/rehabilitation

Equipment: Strap or towel


This week we'll continue our series on patellar tendinitis or "jumper's knee", the most common overuse injury for volleyball players. The anatomy of the knee can be seen here, and an excellent overview of common knee injuries and rehab exercises to consider here.

The lying quadriceps stretch, an excellent exercise for prevention and rehabilitation of patellar tendinitis, is our exercise this week. Remember static stretching exercises, like the lying quadriceps stretch, should be performed after a thorough warm-up. An example of a volleyball specific warm-up can be seen here.


Start position: Lie facedown on the floor with the legs extended. Bend your left knee and grasp the top of your foot or ankle with your left hand. You can use a strap or towel if you cannot grasp your foot. Gradually pull your foot toward your glutes until you feel a stretch along the front of your left thigh. Be careful not to twist your knee.

Hold the stretch for 15 to 30 seconds or 3 to 5 deep breaths. Switch legs and repeat 3 times for each side. It is important to stretch to the point of mild tension and not to over stretch during this movement.

Incorporate the lying quadriceps stretch into your routine 3-7 times per week.

Remember, this information should be used in conjunction with the advice of your health care provider. Thanks for reading and be sure to check back for the next exercise in our series on Healthy, Happy Knees.

See you on the beach!

Eric Hand, MA, CSCS
Exercise Physiologist and Strength and Conditioning Specialist
Fast Twitch Fitness

"We're all athletes. Some of us are just farther along in our training."

Pictures from kinesiology.wikispaces.com

Sunday, June 20, 2010

Exercise of the Week: Scapular Protraction-Retraction

Level: Beginner to Advanced

Specificity: Shoulder stability and strength

Goal: Injury prevention

Equipment: None

This week we'll continue our series on shoulder stability with Scapular Protraction-Retraction. I apologize if the name of this movement brings back haunting memories of high school geometry. The Scapular protraction-retraction movement is designed to promote stability and strength in the shoulder joint. The shoulder joint
provides the greatest range of motion of any joint in the human body, but you already knew that from my last few posts. Right?

Anatomy of the shoulder and rotator cuff can be seen here:


Maintaining a healthy shoulder is crucial to success and longevity in volleyball as the shoulder is involved in all the major skills - serving, setting, digging, blocking and hitting. Research shows that weakness and fatigue of scapular-stabilizing muscles (trapezius, rhomboids, serratus anterior) can lead to pain and a decrease in rotator cuff strength. Our exercise this week will promote proper functioning of the scapula.


Start position: Assume a push-up position with hands directly under shoulders and back flat.

Keeping arms straight, retract shoulder blades by squeezing them together as if you were squeezing a tennis ball between them.

Do not go all the way down as you would with a regular push up. This is a rather subtle movement, designed to isolate and strengthen the scapula stabilizers. You will only move a matter of 1-3 inches for this exercise.

Complete the movement by protracting shoulder blades (spread them apart). Now that was easy wasn't it?

Begin with 10-20 repetitions and work up to 50.

To stabilize your scapula and reduce the strain in your neck and upper shoulders incorporate this movement into your routine 1-2 times per week.

Thanks for reading and be sure to check back next week for more beach volleyball conditioning exercises.


See you on the beach!

Eric Hand, MA, CSCS
Exercise Physiologist and Strength and Conditioning Specialist
Fast Twitch Fitness

"We're all athletes. Some of us are just farther along in our training."

Pictures from crossfitinvictus.com fitnessspotlight.com

Sunday, June 13, 2010

Exercise of the Week: The Sleeper Stretch

Level: Beginner to Advanced

Specificity: Shoulder stability and mobility

Goal: Injury prevention

Equipment: None

This week we'll continue our series on shoulder stability with the Sleeper stretch. No, this does not mean lying down on the couch and dozing off after a long day of volleyball. The Sleeper stretch is a static stretch designed to promote mobility in the shoulder joint.


The shoulder joint provides the greatest range of motion of any joint in the human body.
Maintaining a healthy shoulder is crucial to success and longevity in volleyball as the shoulder is involved in all the major skills - serving, setting, digging, blocking and hitting.

The repetitive actions of serving and hitting in beach volleyball can cause the posterior capsule of the shoulder to tighten over time causing a loss of internal rotation. This loss in mobility can add stress to the musculature of the shoulder joint, increasing our risk of injury.

Any program designed to promote the health and longevity of the shoulder should include a balance of strengthening and stretching exercises. For many of my clients the value of stretching is often overlooked. I don't call stretching the flossing of the exercise world for nothing. It might not always be fun but it's imperative to keeping yourself injury free. Chronically shortened muscles lead to stress, decreased performance, pain and injury. So, if it's been a while since you've "flossed" your shoulders, try this weeks exercise.

The anatomy of the shoulder and rotator cuff can be seen here:


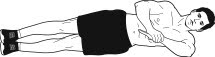
Start position: Lie on your left side forming a straight line with your body. Your shoulders should be stacked directly on top of one another. You may want to use a foam roller or pillow to support your head. Use your left arm as a kickstand by placing your upper left arm on the floor with your fingers pointing to the ceiling. You should have a 90-degree angle with your left arm.


Use your right hand to apply gentle pressure on your left forearm, pushing it towards the floor, without allowing your upper arm to rise.

This is a relatively subtle stretch. Don't expect to be able to place your hand on the floor. Getting to 45-degrees would be...a stretch (ha, ha!) for most athletes.

Hold the stretch for 15-30 seconds. Repeat 3-5 times and switch sides.

Stretching is best performed at the end of a workout after you are thoroughly warmed-up. Include the Sleeper stretch 2-3 times per week as part of your post play routine and before that well deserved nap. Zzzzzzz...........

Thanks for reading and be sure to check back next week for more beach volleyball conditioning exercises.

See you on the beach!

Eric Hand, MA, CSCS
Exercise Physiologist and Strength and Conditioning Specialist
Fast Twitch Fitness

"We're all athletes. Some of us are just farther along in our training."

Exercise picture from www.menshealth.com

Exercise of the Week: Lat Stretch

Level: Beginner to Advanced

Goal: Improved performance and injury prevention

Muscles used: Latissimus Dorsi, Teres Major

Equipment: Physioball, chair or post

Our focus this week is enhancing the effectiveness of our spike by increasing the range of motion in our latissimus dorsi (lats).
The lats are the widest and most powerful muscle of the back. The anatomy of the lats can be seen here:


One of the keys to an effective spike is reaching full extension of the hitting arm to achieve a high point of contact.


Who better to demonstrate perfect hitting technique than Misty May-Treanor?

Due to it's insertion on the humerus (upper arm bone) if the lattisimus dorsi muscle is tight or shortened this will impede our ability to reach up for that buttery set. Umm...buttery sets.


So to ensure that you can reach up and get yours try out this stretch:


Start position - begin by kneeling on the floor, with the physio-ball directly in front of you and hands on top of the ball.

Roll the ball forward by extending the arms and allowing your hips to shift backwards.

Continue to extend the arms forward and your hips backwards until a stretch is felt in the upper back, lats, or shoulders.

Gaze down toward the floor to keep your cervical spine neutral.

Hold this position for 15- 30 seconds. Repeat 1-2 times.

You can also perform this stretch with a partner by holding onto their forearms, slowly bending your knees and leaning back.

Thanks for reading and be sure to check back next week for more beach volleyball conditioning exercises.

See you on the beach!

Eric Hand, MA, CSCS

Exercise Physiologist and Strength and Conditioning Specialist

Fast Twitch Fitness


"We're all athletes. Some of us are just farther along in our training."

Pictures from stacktv.com, pgatour.com, uoregon.edu

Sunday, May 30, 2010

Exercise of the Week: Subscapularis Stretch

Level: Intermediate to Advanced

Specificity: Shoulder stability

Goal: Injury prevention

Muscles Used: Subscapularis, Pectoralis Major, Deltoids


Equipment: Broomstick

This week we'll continue our series on shoulder stability.
The shoulder joint provides the greatest range of motion of any joint in the human body. Maintaining a healthy shoulder is crucial to success and longevity in volleyball as the shoulder is involved in all the major skills - serving, setting, digging, blocking and hitting. However, frequent use of a joint that provides such a wide range of motion can increase our risk for injury.

Any program designed to promote the health and longevity of the shoulder should include a balance of strengthening and stretching exercises.
For many of us the value of stretching is often overlooked. One of my clients put it best - "stretching is like the flossing of the exercise world, it's something that we know we should do but don't do enough." If it's been a while since you've "flossed" your shoulders, I encourage you to try this weeks exercise.

The anatomy of the shoulder and rotator cuff can be seen here:


Our focus this week will be on maintaining/increasing the range of motion of the internal rotators of the shoulder, including the subscapularis, pectoralis major, and deltoid muscles.


Start position: Stand and hold a broomstick or pole in your left arm.


Place your left arm against your abdomen with your left thumb up, pinky down.

Raise your right arm and reach back to grab the broomstick with your right pinky up, thumb down. The broomstick should rest against the back of your right arm.

Position your right arm so that your upper arm (humerus) is parallel to the ground and your forearm is perpendicular to the ground. You should have a 90 degree angle at the elbow.


With your left hand slowly pull the bottom of the broomstick forward until you feel a gentle stretch along the front of the shoulder and underneath your right shoulder blade (scapula).

Hold the stretch for 15-30 seconds and repeat 3-5 times.

Stretching is best performed at the end of a workout after you are thoroughly warmed-up. Include the Subscapularis stretch 2-3 times per week when you get back from the beach and while you're at it, sweep up all that sand you just dragged in!

Thanks for reading and be sure to check back next week for part III of our series on shoulder stabilization for injury prevention.

See you on the beach!

Eric Hand, MA, CSCS
Exercise Physiologist and Strength and Conditioning Specialist
Fast Twitch Fitness

"We're all athletes. Some of us are just farther along in our training."

Exercise pictures from www.floota.com


Monday, May 24, 2010

Exercise of the Week: Side Lying External Rotation

Level: Beginner to Advanced

Specificity: Shoulder stability

Goal: Injury prevention

Muscles Used: Infraspinatus and Teres Minor

This week we'll begin our series on Shoulder Stability. Maintaining a healthy shoulder is crucial to success in volleyball as the shoulder is involved in all of the major skills - serving, setting, digging and hitting. The shoulder joint provides the greatest range of motion of any joint in the body which allows us to perform the skills listed above. However, frequent use of a joint that provides such a wide range of motion can increase our risk of injury.


Our exercise this week is designed to increase the strength of the external rotators of the rotator cuff. The anatomy of the shoulder and rotator cuff can be seen here:


Why spend time to strengthen the small muscles of the rotator cuff? To put it simply, a chain is only as strong as its weakest link. When the rotator cuff muscles are weak, the rest of the shoulder complex is put at risk because it now has to take on an unnatural portion of the work.

The good news is a few simple exercises is all it takes to strengthen the rotator cuff muscles. Our first exercise, and one of the most effective strengthening exercises for the rotator cuff, is the Side Lying External Rotation.

Start position: Lie on your right side with a light dumbbell in your left hand.


Begin with your left arm bent 90°, your upper arm held tight against your ribcage and your forearm angled toward the floor.

Gradually rotate your left shoulder so that the forearm travels upwards, away from the floor. Raise the dumbbell as high as you can, without letting your upper arm lose contact with your ribcage.

Slowly return to the starting position. Complete 10 to 12 repetitions. Repeat on the opposite side.

Incorporate strengthening exercises like the Side Lying External Rotation into your conditioning routine once or twice per week for best results.

Thanks for reading and be sure to check back next week for part II of our series on shoulder stabilization for injury prevention.


See you on the beach!

Eric Hand, MA, CSCS
Exercise Physiologist and Strength and Conditioning Specialist
Fast Twitch Fitness

"We're all athletes. Some of us are just farther along in our training."

Exercise pictures from http://stacktv.stack.com/

Saturday, May 15, 2010

Exercise of the Week: The Box

Level: Beginner to Advanced

Goal: Improve footwork and ability to change direction quickly

Equipment: None

This week concludes our series on agility training. Remember, agility is the ability to move quickly and change directions while maintaining control of the body. To be effective on the beach an athlete will need speed, balance, power and co-ordination. Agility training plays an integral role in developing these attributes.

Our drill this week is the Box. This is an excellent drill to warm-up the lower body, improve our footwork and enhance our ability to change directions quickly.

Be sure to perform a thorough warm up (click here) before performing the Box drill.


Start in the back left corner, facing the net, and sprint straight ahead to the net.
Immediately transition to a shuffle across the court to the front right corner.
Transition quickly to a back pedal all the way to the back right corner of the court.
Finish the drill by shuffling across to the back left corner of the court where you started.

Repeat 3-5 times with 45-60 seconds of rest in between repetitions.

Key points - When you shuffle stay low in a defensive position and avoid clicking your heels or crossing your feet. Keep the weight on the balls of your feet and not your heels.

Intermediate and advanced players can increase the intensity of the drill by adding an approach jump after the sprint to the net and a block jump after the first shuffle.

For variety you may also want to try the following pattern.


Incorporate agility drills like the Box into your conditioning routine once or twice per week for best results.

Thanks for reading and be sure to check back next week when we'll start our series on shoulder stabilization for injury prevention.

See you on the beach!

Eric Hand, MA, CSCS
Exercise Physiologist and Strength and Conditioning Specialist
Fast Twitch Fitness

"We're all athletes. Some of us are just farther along in our training."

Pictures from http://stacktv.stack.com/

Monday, May 10, 2010

Exercise of the Week: Line Hops

Level: Beginner to Advanced

Goal: Increase ability to change direction quickly, injury prevention

Equipment: None

This week we'll continue our series on agility training. Agility is the ability to move quickly and change directions while maintaining control of the body. To be effective on the beach an athlete will need speed, balance, power and co-ordination. Agility training plays an integral role in developing these attributes.

Our drill this week is the Line Hop. This is an excellent exercise to warm-up the lower body and increase our ability to change directions quickly.

Draw lines, two to three feet long, in the sand to form a + shape.


Facing the net, stand in the lower right corner of the box. It may help to think of this spot as box 1. The box immediately to your left would represent box 2. The box immediately in front of box 2 would represent box 3. The box immediately to the right of box 3 would represent box 4.


Starting in box one perform small, quick hops in a 1-2-3-4 pattern (left, forward, right, back). Repeat this pattern as many times as you can for 15 seconds. Rest for one minute and repeat.

For variety try hopping in different patterns. Some examples would be 1-3-2-4 (diagonal, back, diagonal, back), 1-4-2-3 (forward, diagonal, forward, diagonal), 1-2-4-3 (left, diagonal, right, diagonal).

Perform 2 sets of 2 different patterns.

Advanced athletes can work up to single-leg hops, repeating the pattern for 10 seconds with 30 seconds rest in between sets. Remember to work both legs!

Key points: Think of moving you feet as quickly as possible while staying in control, imagine hot coals underneath your feet! Keep your hips square and land as softly as possible.

Incorporate agility drills like the Line Hop into your conditioning routine once or twice per week for best results.

See you on the beach!

Eric Hand, MA CSCS
Exercise Physiologist and Strength and Conditioning Specialist
Fast Twitch Fitness

"We're all athletes. Some of us are just farther along in our training."

Picture from http://stacktv.stack.com/

Sunday, May 2, 2010

Exercise of the Week: The Lateral Hop and Hold

Level: Intermediate and Advanced

Goal: Increase ability to change direction quickly, injury prevention

Equipment: None

This week we'll continue our series on agility training. Agility is the ability to move quickly and change directions while maintaining control of the body. To be effective on the beach an athlete will need speed, balance, power and co-ordination. Agility training plays an integral role in developing these attributes.

Our drill this week is the Lateral Hop and Hold. This is an excellent exercise for increasing our agility and reducing muscle soreness and risk of injury in the hips and knees.

Be sure to perform a thorough warm up before performing the Lateral Hop and Hold.

Stand on right leg with right knee slightly bent.


Hop two to three feet laterally toward the left.


Land softly on the left leg and hold position for two seconds.


Push off left leg to hop laterally to the right.

Land softly on the right leg and hold position for two seconds.

Repeat for a total of 10 repetitions.

Intermediate players should perform 2 sets with 30 seconds of rest between sets.
Advanced players should perform 3-4 sets with 30 second rest periods between sets.

Key points: Keep your hips square and land as softly as possible. Gradually increase the intensity of the exercise by bounding higher and farther from side to side.

Incorporate agility drills like the Lateral Hop and Hold into your conditioning routine once or twice per week for best results.

See you on the beach!
Eric Hand, MA CSCS
Exercise Physiologist and Strength and Conditioning Specialist
Fast Twitch Fitness

"We're all athletes. Some of us are just farther along in our training."

Picture from http://stacktv.stack.com/

Sunday, April 11, 2010

Exercise of the Week: The Bicycle

Level: Beginner/Intermediate

Specificity: Core strength and stability

Goal: Injury prevention, power

Muscles used: Rectus Abdominus, Transverse Abdominus, Obliques

Equipment: none


This week we'll continue our series on torso/core conditioning exercises with the Bicycle. The bicycle has been shown to be one of the most effective exercises for developing muscles of the core. Remember, the torso or core provides the link between upper and lower body strength and power and including core conditioning in your training will provide you with a more stable platform for that perfect pass and develop the power necessary for the third hit.

Click here for muscles of the core

Start position: Lie flat on the floor with your lower back pressed to the ground. Place your fingertips on the side of your head with your elbows held wide. Bring knees toward your chest at a 90 degree angle.


As you contract your abdominal muscles raise your shoulder blades off the floor and rotate your torso to touch your left elbow to your right knee while straightening your left leg. Repeat on the opposite side by bringing your right elbow to your left knee and straightening your right leg. Continue to alternate sides in a smooth pedaling motion. Remember to keep your breathing even and relaxed throughout the movement and keep your elbows wide to avoid pulling on your neck.

Beginners should perform 1-2 sets of 10 repetitions. Intermediate/Advanced athletes should perform 2-3 sets of 20 repetitions.

Incorporate the Bicycle into your conditioning routine twice per week for best results. Be sure to check out the additional core training exercises in the coming weeks to develop a well balanced conditioning program.


See you on the beach!

Eric Hand, MA , CSCS
Exercise Physiologist and Strength & Conditioning Specialist
Fast Twitch Fitness

“We’re all athletes. Some of us are just farther along in our training.”

Picture from About.com

Monday, April 5, 2010

Exercise of the Week: Stability Ball Bridge

Level: Beginner/Intermediate

Specificity: Core strength and stability

Goal: Injury prevention, power

Muscles used: Erector Spinae, Rectus Abdominus, Transverse Abdominus, Gluteus Maximus, Obliques

Click here for muscles of the core

Equipment: Stability ball

This week we'll continue our series on torso/core conditioning exercises with the Stability Ball Bridge. Remember, the torso or core provides the link between upper and lower body strength and power and including core conditioning in your training will provide you with a more stable platform for that perfect pass and develop the power necessary for the third hit.


Start position: Lie on your back with your heels and lower legs hip-width apart on top of the stability ball. Contract your abdominal muscles gently to flatten your lower back. Place your arms out to your sides in a T position for stability.


While maintaining a flat back, exhale and press your heels into the stablity ball. Lift your hips off the floor until your body forms a straight line from your lower legs to your shoulders.

As you inhale slowly lower to the start position.


To increase the intensity of this movement raise one leg off of the ball in the top position. (Advanced)

Remember, keep your back flat and breathe.

Beginners should perform 1-2 sets of 8 repetitions.
Intermediate/Advanced should perform 3 sets of 12 repetitions.

Incorporate the Stability Ball Bridge into your conditioning routine twice per week for best results. Be sure to check out the additional core training exercises in the coming weeks to develop a well balanced conditioning program.

Until then, see you on the beach!

Eric Hand, MA , CSCS
Exercise Physiologist and Strength & Conditioning Specialist
Fast Twitch Fitness

“We’re all athletes. Some of us are just farther along in our training.”

Pictures from American Council on Exercise

Sunday, March 28, 2010

Exercise of the Week: Russian Twist

Level: Beginner/Intermediate

Specificity: Core stability and power

Goal: Injury prevention, power

Muscles used: Rectus abdominus, transverse abdominus, erector spinae

Equipment: Volleyball or 2-6 pound medicine ball for intermediate, advanced

This week we'll start our series on torso/core conditioning exercises with the Russian twist. The torso or core provides the link between upper and lower body strength and power and including core conditioning in your training will provide you with a more stable platform for that perfect pass and develop the power necessary for the third hit.

The muscles of the core can be seen here:


Be sure to perform a thorough warm up (click here) before performing the Russian twist.

Start position: Begin seated with your knees bent, feet together, heels on the floor. Sit upright with your chest raised towards the ceiling and back erect. Extend arms in front in a dig position.


Without leaning backwards rotate the torso from side to side keeping your arms extended and pausing briefly in the start position each time. Concentrate on keeping your back flat, chest out and making full rotations. Repeat the movement back and forth for the desired number of repetitions.

Beginners: 20-30 repetitions
Intermediate: 30-50 repetitions
Advanced: 50-80 repetitions

To increase the difficulty of this exercise
hold a volleyball or medicine ball (2-6 lbs) close to the torso while performing the movement. Additional variations include leaning back at a 45 degree angle to the floor while keeping your knees bent and heels on the floor. To further increase intensity of the movement lift the feet 3-6 inches off the ground.

The importance of training the abdominal and lower back muscles is often overlooked and as a result injuries can occur. Adding the Russian twist to your routine is a great start to reducing your risk of injury. Be sure to check out the additional exercises in the coming weeks to develop a well balanced core conditioning program.

See you on the beach!

Eric Hand, MA , CSCS
Exercise Physiologist and Strength & Conditioning Specialist
Fast Twitch Fitness

“We’re all athletes. Some of us are just farther along in our training.”

Pictures from American Council on Exercise and www.healthican.com

Saturday, March 6, 2010

Exericse of the Week: Box Jumps

Level: Beginner/Intermediate

Specificity: Power

Goal: Improving vertical jump

Equipment: Plyometric box, 6 to 42 inches high

We’ll continue our plyometric training this week with the box jump. For those of you new to plyometrics, these movements are designed to enable a muscle to reach maximal force in the shortest time possible, a crucial factor in the beach game.

Before adding plyometrics to your routine here are two things to consider. First, it is recommend that you practice bodyweight and back squats with weight to develop lower body strength and proper technique before attempting jumping movements. (Click here for proper squatting technique). The National Strength and Conditioning Association recommends you should be able to squat a least 1.5 times your body weight one time before engaging in high intensity plyometric exercises.(1) Individuals with preexisting orthopedic conditions (such as osteoarthritis or knee surgery) should perform plyometrics cautiously.

Be sure to perform a thorough warm up (click here) before performing the box jump.


Start position – stand about two feet away from the plyometric box with your feet shoulder width apart. Maintain a flat back as you draw your shoulder blades together and down. Engage your core by gently flexing your abdominal muscles to support your spinal column.

Begin with a 1/4 squat by bending at the hips and knees while keeping your weight in your heels. Look straight ahead or slightly up to maintain a flat back. Draw your arms back while continuing to bring shoulder blades together and down.


At the bottom of the downward phase quickly reverse directions by exploding upwards and simultaneously extending through your ankles, knees and hips. This movement is referred to triple extension and is key to maximizing the height of your jump. Explode upwards and slightly forward to land on top of the box. Swinging your arms forward and up will add height to your jump.


As you land on the box focus on landing softly and quietly. Land on both feet simultaneously and be sure to keep your knees soft. Allow your hips to drop and push backwards to absorb the force of jumping. Think about landing in the middle of the foot and quickly allowing your weight to shift back towards your heels. Maintain a forward gaze with your torso inclined slightly forward.

Carefully step down from the box and repeat 8-20 times.

Beginners: Start with a box height of 6 inches and 8 jumps. Add two jumps per week until you can perform 20 box jumps. You may then choose to increase the height of the box.

Incorporate one or two plyometric movements like this into your conditioning routine twice per week for best results.

See you on the beach!

Eric Hand, MA , CSCS
Exercise Physiologist and Strength & Conditioning Specialist
Fast Twitch Fitness

“We’re all athletes. Some of us are just farther along in our training.”

(1) Essentials of strength training and conditioning / National Strength and Conditioning Association (3rd edition), 2008.

Pictures from http://magazine.stack.com/

Sunday, February 28, 2010

Exericse of the Week: Tuck Jumps

Level: Beginner

Specificity: Power

Goal: Improving vertical jump

We’ll continue our plyometric training this week with the tuck jump. For those of you new to plyometrics, these movements are designed to enable a muscle to reach maximal force in the shortest time possible, a crucial factor in the beach game.

Before adding plyometrics to your routine here are two things to consider. First, it is recommend that you practice bodyweight and back squats with weight to develop lower body strength and proper technique before attempting jumping movements. (Click here for proper squatting technique). Also, the National Strength and Conditioning Association recommends you should be able to squat a least 1.5 times your body weight one time before engaging in high intensity plyometric exercises.(1) Individuals with preexisting orthopedic conditions (such as osteoarthritis or knee surgery) should perform plyometrics cautiously.

Be sure you perform a thorough warm up (click here) before performing the tuck jump.


Start position – stand with your feet hip to shoulder width apart. Maintain a flat back as you draw your shoulder blades together and down. Engage your core by gently flexing your abdominal muscles to support your spinal column.

Begin the downward phase by bending at the hips and knees while keeping your weight in your heels. Look straight ahead or slightly up to maintain a flat back. Draw your arms back while continuing to bring shoulder blades together and down.

At the bottom of the downward phase quickly reverse directions by exploding upwards and simultaneously extending through your ankles, knees and hips. This movement is referred to triple extension and is key to maximizing the height of your jump. As you explode upwards drive the knees as high as possible towards the chest. Swinging your arms forward and up will add height to your jump.

As you return to the ground think about landing softly and quietly. Land on both feet simultaneously and be sure to keep your knees soft. Allow your hips to drop and push backwards to absorb the force of jumping. Think about landing in the middle of the foot and quickly allowing your weight to shift back towards your heels. Maintain a forward gaze with your torso inclined slightly forward.

With the slightest pause possible immediately explode upwards again, overemphasizing driving the knee towards the chest.

Perform 4-6 consecutive tuck jumps without stopping between jumps.

Repeat 1-2 times after with a 3-5 minute rest between sets.

Incorporate this movement into your conditioning routine once a week for best results.

See you on the beach!

Eric Hand, MA , CSCS
Exercise Physiologist and Strength & Conditioning Specialist
Fast Twitch Fitness

“We’re all athletes. Some of us are just farther along in our training.”

(1) Essentials of strength training and conditioning / National Strength and Conditioning Association (3rd edition), 2008.

Sunday, February 21, 2010

Exercise of the Week:Lateral Cone Hops

Level: Intermediate

Specificity: Power

Goal: Improving vertical jump

We’ll continue our plyometric training this week with lateral cone hops. For those of you new to plyometrics, these movements are designed to enable a muscle to reach maximal force in the shortest time possible, a crucial factor in the beach game.

Before adding plyometrics to your routine here are two things to consider. First, it is recommend that you practice bodyweight and back squats with weight to develop lower body strength and proper technique before attempting jumping movements. (Click here for proper squatting technique). Also, the National Strength and Conditioning Association recommends you should be able to squat a least 1.5 times your body weight one time before engaging in high intensity plyometric exercises.(1) Individuals with preexisting orthopedic conditions (such as osteoarthritis or knee surgery) should perform plyometrics cautiously.

Be sure you perform a thorough warm up (click here) before performing the lateral cone hops.

Recommended equipment:
Intermediate (> 3 months regular strength training experience): (4) six inch cones
Advanced (> 1 year regular strength training experience): (4) ten inch cones

Position the cones two feet apart in a straight line on a non-skid surface. Surfaces like rubber gym mats, grass or sand are safest for this exercise. Avoid performing this movement on harder surfaces like concrete.


Stand with your left foot six inches from the cone with your feet shoulder width apart. With arms by your side maintain a flat back as you draw your shoulder blades together and down. Engage your core by gently flexing your abdominal muscles to support your spinal column.

Begin the downward phase by bending at the hips and knees while keeping your weight in your heels. Look straight ahead to maintain a flat back. Draw your upper arms against your sides while continuing to bring shoulder blades together and down.


At the bottom of the downward phase quickly jump up and over the first cone by simultaneously extending through your ankles, knees and hips. The forceful extension through your ankles, knees and hips is referred to as triple extension and is key to maximizing the height of your jump.


As you return to the ground focus on landing softly and quietly. Land on both feet simultaneously and be sure to keep your knees soft. Allow your hips to drop and push backwards to absorb the force of jumping. Think about landing in the middle of the foot and quickly allowing your weight to shift back towards your heels. Maintain a forward gaze with your torso inclined slightly forward.

With as little pause as possible, immediately extend through your ankles, knees and hips simultaneously (triple extension) to explode upwards and over the next cone.

Repeat until you have jumped over each cone. Rest 90-120 seconds and repeat in the opposite direction.

Intermediate- complete 1 set in each direction for a total of 8 jumps
Advanced- complete 2 sets in each direction for a total of 16 jumps

Incorporate this movement into your conditioning routine once a week for best results.

See you on the beach!

Eric Hand, MA , CSCS
Exercise Physiologist and Strength & Conditioning Specialist
Fast Twitch Fitness

“We’re all athletes. Some of us are just farther along in our training.”

(1) Essentials of strength training and conditioning / National Strength and Conditioning Association (3rd edition), 2008.

Pictures from American Council on Exercise


Sunday, March 1, 2009

Rainy Day Workouts

Remember when you were a kid and you would play for hours and hours? We’d play not because it lowered our cholesterol, or blood pressure or because our doctor told us to. We simply did it because it was FUN!!!! I wonder what the magic age is when play becomes “exercise”?

I would venture to say I’m not the only one who plays volleyball because it’s fun and gives me the opportunity to “play” for hours.

Well, how can we keep that fun feeling on those rainy days when we can’t play at the beach and don’t feel like hitting the gym?

Here’s a quick 30 minute workout you can do at home that will keep the fun factor high (and oh yes, it will improve your conditioning too).

Equipment you’ll need

Jump rope
Volleyball or medicine ball for extra resistance
Mix of your favorite songs to keep you movin'

Rainy Day Workout (Circuit #1)
  • Knees to Elbows for 30 seconds

  • 12 Squats (see proper squatting technique in the Volleyball Conditioning posting)
  • 20 Jumping jacks
  • 10 Pushups
  • 25 Crunches
  • Jump rope for one minute
  • 15 Skaters to each side

  • 15 Medicine Ball Pops

  • 50 Bicycle crunches (similar to crunches but alternating knee to elbow)
  • Jump rope for one minute
  • 8 Lateral lunges in both directions (see proper lunge technique in the Volleyball Conditioning posting)
  • 12 Triceps extension with medicine/volleyball (pacefit.com med ball)

  • Foot to foot crunches (15 to each side)

  • Jump rope for one minute
  • 15 Medicine Ball Pops (see above)
  • 8 Burpees


Phew! Nice job, Now take some well deserved water and a few minutes to stretch.

Hope you enjoyed this workout and I'll see you on the beach when the sun returns!

Eric Hand, MA , CMT
Exercise Physiologist
Fast Twitch Fitness

“We’re all athletes. Some of us are just farther along in our training.”

All the information presented on the FastTwitchFitness Blog is for educational and resource purposes only. It is there to help you make informed decisions about health related fitness issues. It is NOT a substitute for any advice given to you by your physician. Always consult your physician or health care provider before beginning any exercise program. Use of the programs, advice, and information contained in this website is at the sole choice and risk of the reader.
In no way will FastTwitchFitness or any persons associated with FastTwitchFitness be held responsible for any injuries or problems that may occur due to the use of this blog or the advice contained within. FastTwitchFitness will not be held responsible for the conduct of any companies and/or websites recommended within this blog.

Sunday, January 25, 2009

Volleyball Conditioning

Beach volleyball is a very dynamic game that requires strength, agility, flexibility and power. If you want your body to be ready to respond for that first dive onto the sand or that first joust at the net, it is crucial that you are properly conditioned.

When you arrive at the beach, before you even touch a ball, I recommend you include a few dynamic warm-up exercises. A dynamic warm-up involves sport specific exercises that involve moving the body through slow and controlled ranges of motion. I know that it can be tempting to just “dive” in and start playing, however, a good warm-up can be completed in as little as five minutes. Think of this time as an investment to both reduce your risk of injury and prepare your body for the explosive demands that will be placed on it as soon as the first ball is served. A dynamic warm-up will also awaken your nervous system and help you focus on the upcoming game.

You should perform these movements to your own ability and do not attempt to match someone else’s strength or range of motion. Find your own edge and gradually work to improve it. This month we’ll focus on developing lower body strength and flexibility. Be sure to start at the appropriate level. If you perform these warm-ups regularly you should see improvement and be able to advance to the next level within a month.

Squat with arm extension (Beginner)


Stand with feet slightly turned out, shoulder width apart and knees slightly bent. Reach arms out to form a flat platform as if you were going to pass or dig a ball. Inhale deeply and slowly bend your knees to squat down. Think about sitting back and placing your weight on your heels. As you squat be sure to keep your chest high, upper and lower back arched and tight, gaze forward, and weight on your heels. Allow your knees to spread outward toward the toes. Be sure your knees do not move past your toes, however, and do not attempt to go deeper than a thighs parallel to the ground position. Complete the movement by exhaling slowly and pressing through your heels to return to a standing position. Repeat 8-12 times.

You should feel this movement in your quadriceps, glutes and hamstrings, not in your knees or lower back. If flexibility is a problem try using a wider stance. When done properly the squat is a safe exercise and critical to developing speed and vertical jump. Injuries occur when athletes are rushed or not focused and forget to adhere to proper form and technique.

Net Duck (Intermediate)


Stand perpendicular to the net, feet 6-12 inches apart, right shoulder next to the net. Reach arms out as if you were going to pass or dig a ball. Inhale deeply and step your right foot to the right as you slowly bend your knees to squat down underneath the net. Think about sitting back and placing your weight on your heels as you squat down. As you squat be sure to keep your chest high, upper and lower back arched and tight, gaze forward, and weight on your heels. As you squat be sure to keep your arms extended, chest high, gaze forward, , upper and lower back arched and weight on your heels. Complete the movement by exhaling and standing up on the other side of the net. Repeat, this time squatting under the net toward your left. As you squat underneath the net visualize getting low to dig a hard driven ball.

Lateral Squat with arm extension (Advanced)


Stand on the left side line facing the net, feet shoulder width apart. Reach arms out as if you were going to pass or dig a ball. Inhale deeply and step your right foot several feet to the right as you slowly bend your knees and squat down and to your right. As you squat think about sitting back and placing your weight on your heels as you squat down. Be sure to keep your chest high, upper and lower back arched and tight, gaze forward, and weight on your heels. Visualize getting low and digging a hard driven ball as you squat. Complete the movement by exhaling and returning to a standing position. Repeat until you reach the right side line. Repeat by leading with your left foot and squatting to the left side line.

These exercises will help improve your lower body strength as well as the flexibility in your hips, knees, ankles and inner thigh.

Have a blast with these exercises this month and I welcome your questions and comments.

See you on the beach!

Eric Hand, MA , CMT
Exercise Physiologist
Fast Twitch Fitness

“We’re all athletes. Some of us are just farther along in our training.”